1. 前提要求
k8s环境已经正确安装,k8s的环境一般可以选择根据k8s官网的安装步骤或者选择minukube:
- 官网安装:虚拟机安装
- minukube: minikube start
2. istio安装
安装Istio相对比较简单,官网也提供了详细的安装步骤, 参考链接:Istio getting started
Istio的安装方式:
- Istioctl 安装
- Operator 方式的安装
- Helm 安装(已被弃用)
3. Istioctl 安装
3.1. 下载istio
curl -L https://istio.io/downloadIstio | sh -

cd istio-1.19.3
3.2. 添加istioctl到PATH
export PATH=$PWD/bin:$PATH3.3. 安装istio
istioctl install --set profile=demo -y3.4. 注入k8s namespace
kubectl label namespace default istio-injection=enabled4 Istio配置文件
参考链接: Istio-Installation Configuration Profiles
4.1 Istio内建配置文件
-
default: enables components according to the default settings of the IstioOperator API. This profile is recommended for production deployments and for primary clusters in a multicluster mesh. You can display the default settings by running the istioctl profile dump command.
-
demo: configuration designed to showcase Istio functionality with modest resource requirements. It is suitable to run the Bookinfo application and associated tasks. This is the configuration that is installed with the quick start instructions.
This profile enables high levels of tracing and access logging so it is not suitable for performance tests.
minimal: same as the default profile, but only the control plane components are installed. This allows you to configure the control plane and data plane components (e.g., gateways) using separate profiles.
-
remote: used for configuring a remote cluster that is managed by an external control plane or by a control plane in a primary cluster of a multicluster mesh.
-
empty: deploys nothing. This can be useful as a base profile for custom configuration.
-
preview: the preview profile contains features that are experimental. This is intended to explore new features coming to Istio. Stability, security, and performance are not guaranteed – use at your own risk.
-
ambient: the ambient profile is designed to help you get started with ambient mesh.
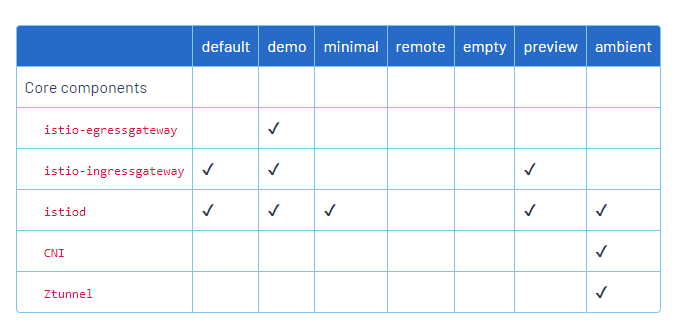
4.2 配置与组件对应
5. Istio ingress NodePort修改
由于Istio ingress Service模式方式为LoadBalancer,但是我们的可能没有LoadBalancer, 在这种情况下我们可以把istio-ingressgateway修改为NodePort, 我们使用yaml为istio-ingressgateway编写一个NodePort service, yaml文件如下:
apiVersion: v1
kind: Service
metadata:
  name: istio-ingressgateway
  namespace: istio-system
spec:
  type: NodePort  #从LoadBalancer改为NodePort
  ports:
  - port: 80
    targetPort: 8080
    nodePort: 31080  #指定一个NodePort
  selector:
    app: istio-ingressgateway
文件保存后,使用命令应用:
kubectl apply -f istio-ingressgateway-nodeport.yaml命令执行成功后我们查看service,
kubectl get svc -n istio-system
istio-ingressgateway   NodePort    10.102.189.254   <none>        15021:32187/TCP,80:31080/TCP,443:31818/TCP,31400:32039/TCP,15443:32064/TCP   2d20h
访问Istio-ingressgateway
如果你的端口为31080,那么就用Http://{your_ip}:31080访问;如果遇到无法访问自己的服务,主要关注下自己的服务有没有接收到请求,如果没有一般来说都是因为配置不正确导致,需要检查配置,比如:没有匹配到Pod导致流量未转发。